Auto Dimming Rear View Mirror with Compass and Temperature Sensor
 The Night Vision Auto Dimming rear view mirror from Quadratec automatically compensates for glare in the rear view mirror. It does this using an optical sensor on the front and rear of the mirror, and compares the readings between the two, then adjusts the mirror as necessary. The same mirror can be found as an option or standard on many new high-end vehicles. With the stock Jeep mirror you only have two options, bright or dark. The Night Vision mirror has all the stages in between and fades smoothly. The Night Vision Auto Dimming rear view mirror from Quadratec automatically compensates for glare in the rear view mirror. It does this using an optical sensor on the front and rear of the mirror, and compares the readings between the two, then adjusts the mirror as necessary. The same mirror can be found as an option or standard on many new high-end vehicles. With the stock Jeep mirror you only have two options, bright or dark. The Night Vision mirror has all the stages in between and fades smoothly.
Two other nice features are the Temperature readout and the Compass. The Temperature can be displayed in either Centigrade (°C) or Farenheit (°F) - so you know just how hot it is out there! The Compass displays in N / NE / E / SE / S / SW / W / NW format, and while an accurate bearing would be nice, it's useful for "do we go left or right here?" situations!
With the rising popularity of the high-glare "blue tint bulbs" on the roads, the rising number of poor crash repairs which result in the headlights not being aimed correctly, and the occasional person that doesn't know their high-beams are on, we decided it was time to do a little preventative protection on the Jeep. With the mirror automatically compensating, you are no longer distracted by the glare of the person behind you. The safety benefit is obvious, you can now fully concentrate on what you're doing. You don't even need to take your hand off the wheel to press any buttons.
In short, it's awesome, but now on with the Install write up!
The mirror is shipped with generic instructions designed for all cars. The following write up is specific to the TJ (1997+) Jeep Wrangler, although it may be helpful for owners of other vehicles too.
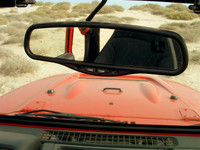
 Start by removing the old mirror. This is done by unsrewing the Torx-T20 screw that locks the mirror into place, and lift it up. It should easily come away from the window leaving the metal "button" behind, still secured to the window.
 The new Mirror fits the original button, however about 3-4 weeks after installing the mirror, it fell off in 40°C weather. We're assuming the extra weight of the mirror was too much for the original glue in that temperature. Fortunately, we had ordered the mounting kit at the same time. You may want to carefully remove the button at this point. We emphasise carefully, as too much force could crack the window. When fixing the new one on, you may want to attach it slightly higher than the old one for a better view out the window.
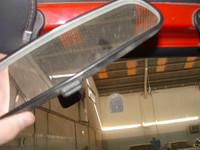
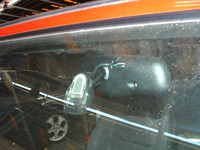 This image shows the front side, with the silver button visible. You can also see the opening for the front optical sensor. As we were still using the original button mount in this picture, we just adjusted the mirror up for a clear view out the front. The mirror has a lot of adjustability.
 The next stage is finding a position for the front temperature sensor. The supplied instructions will tell you to clip the sensor on to the plastic front bumper. That works for cars, but not for Jeeps!
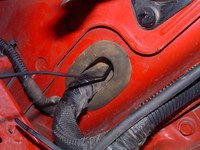
The aim is to have a clear air flow over the tip of the sensor. The 2003+ Jeep Wranglers have the option of having this mirror from the factory, and their sensor is mounted infront of the radiator, behind the grill, on a small bracket. As our 2001 model doesn't have the bracket, I removed the swaybar cover to inspect the area underneath it for a possible attachment point. I'm sure it's possible to get the bracket as spare parts from your dealer, I just didn't bother.
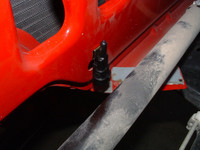 We found a hole in the sheet metal that would allow the sensor to be positioned vertical, and would be slightly shielded from the radiator by one of the grill slats. We had to squeeze the clip on the sensor as it's designed to mount on thick bumper plastic, not thin sheet metal.
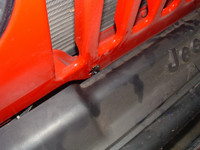
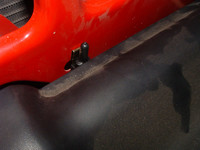 We then test fitted the swaybar cover again to ensure there was enough clearance and that there was enough of the sensor exposed to allow it to get an accurate reading. As luck would have it, it was a perfect fit.

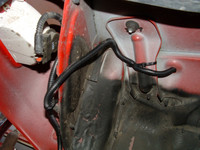 As the lightbar wiring already passed through the drivers side of our windshield frame, we decided the mirror's wiring would take the same route. We zip-tied the wiring loom across the bottom of the grill, resting on a lip of the bodywork. The wires are then routed up and above the steering box, up and out the way, then under the fender and into the engine bay through an existing hole. We secured the wiring loom to the existing loom for the turn-signals.
 The wire was then run along the inside lip of the engine bay, where the hood closes. Again we secured it to an existing wiring loom, and then back towards the firewall. A small hole was carefully made in the existing seal for the main vehicle wiring loom to then pass the temperature sensor wire through, and it was then in the drivers foot-well area.
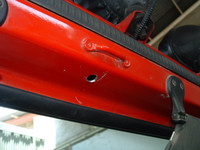 The next stage was to find a grommet that you can fit the wires through. The power wires are already placed into a clip, and the temperature wires come with terminals to be pushed into the main clip. We made a note of where the wires were supposed to go, and removed the power wires from the clip. After selecting a suitable grommet, we then matched up a drill side and drilled the windshield frame. Don't forget to throw some protection over the dashboard and seats or you'll be dealing with metal filings for weeks to come. Be careful not to slip with the drill. Even after center-punching it, we need some touch up paint!
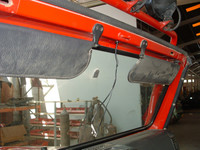
 The next step was to remove the Sport-cage bars, each side has two T40 Torx bolts securing it to the window, and two in the rear securing it to the cage. You will need to unzip the padding to access these. It is NOT the T50 Security-Torx bolt on the bar itself. Remove the bars, and remove the black T40 bolt on the side of the windshield hinge, then fold the windshield down. If you have a 2003+ Wrangler, you can just run the wires behind the new plastic window frame cover.
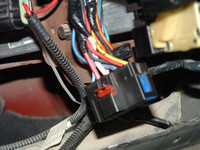 The next stage is finding an ignition-switched power source for the mirror. We were at the dealership at the time and one of their electricians suggested using the blue wire on the ignition loom behind the steering column. A quick test confirmed this wire was live when the ignition was on, and off at other times. We suggest doing the same confirmation before picking a wire, there's quite a lot of them there! An alternative power source is the switched accessory line behind the glove box on the passenger side.
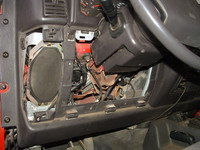 The mirror is supplied with a clip-on terminal which you just push on to the wire, and it cuts the casing and makes contact with the wire itself. You then connect them irror's power line to the terminal, and then run the ground wire to the dash frame, using the existing point below the speakers.
As there was a potential for the wires to be damaged when the window frame was raised again, we added an inline fuse to protect the Jeep in the event of a short circuit.
The power and temperature probe wires are then fed up to the top of the dash behind the AC vent, and secured out of the way.
 Now the fun challenge, getting the power and temperature probe wires through the windshield frame and up to the center, and back out again! We had some thick cable lying around, so we bent the end of it so that it would naturally go round the corners of the windshield frame, and just basically passed it through and all the way around. When we finally saw the cable through the hole at the bottom of the windshield frame, a bent coat hanger was used to hook it out. We then attached the power and temperature probe wires to the cable with masking tape, ensuring it was smooth so they didn't get snagged. Pull the cable back out and the wires should come with it. Pass the wires one-by-one through the grommet and push the grommet into the hole.
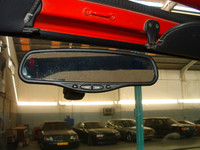
Finally, mount the new mirror again using the T20 Torx bit, connect the wires to the clip, and connect the clip to the mirror. Adjust it to where you want it, and turn the ignition on. You should see the display in the corner, and you can test the auto-dimming by covering the front sensor (making it think it's dark) and shining a light in the rear sensor. You will see the entire mirror fade out to darkness. Very cool! The compass will be in calibration mode initially, and driving the Jeep in couple circles will let it calibrate automatically.
The Temperature can be switched from °C to °F by holding the Temp button down for 3 seconds until the current measurement unit starts flashing, release and press Temp again to toggle between °C and °F. Leave it alone for a few seconds and it will save the setting. The display is clear and visible even at the middle of the day with no roof on the Jeep.
The Auto-Dimming function can be disabled by holding the Temp button for 6 seconds, and the green LED next to the temp button will go out. Next time you start the Jeep, Auto-Dimming will automatically be enabled again.
Now take the Jeep for a drive at night and see what it's like to have a little luxury in your Wrangler!
|
| Quadratec Auto Dimming Rear View Mirror |
Contact Info:
| Product numbers: |
| # 93011 01: | Night Vision Auto-Dimming Mirror |
| # 93011 51: | Mirror Mounting Kit |
| # 98002 00: | Deluxe Torx Socket Set for Jeeps |
|
|
If you found this installation guide useful, please support this site by using the Referral links to Quadratec on this site when purchasing your Jeep accessories. Quadratec has extremely competetive prices and fantastic customer service. Support our sponsors and we will be able to add new installation guides in the future! on this site when purchasing your Jeep accessories. Quadratec has extremely competetive prices and fantastic customer service. Support our sponsors and we will be able to add new installation guides in the future!
Back to the Installs index
|
|