The following article and pictures are credited to Frank D., aka Daless2 on Jeepsunlimited.
Back to the Installs index
Auxiliary Cooling ¢ Hood Vents
Hi Folks, this will be the first of at least two, possibly three write-ups on my efforts to better manage under hood temperatures. This one will be on Hood Louvers and my thinking, testing and implementation on my 97 TJ Wrangler with the 4.0L 6Cyl Engine.
This write up on Hood Vents is in two parts:
End Result:
I think the best way to start this off is with the results and a picture of the end result.
Given an outside air temperature of 90+ degrees F, I have been able to reduce the under hood air temperatures on my 97 TJ by as much as;
- 11 degrees F at Idle.
- 16 degrees F during Stop and Go
- 27 degrees F during Highway Travel
Here is what this implementation looks like:
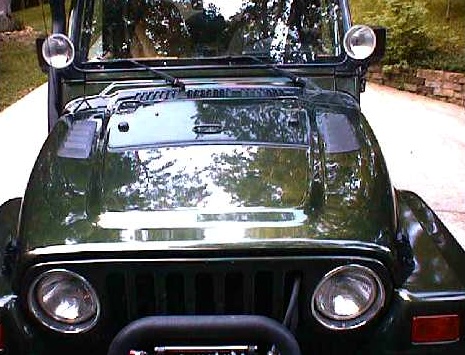
What you are looking at is the hood of my Jeep after installing the Louvers which allow the under hood temperatures to be lowered as I have shared above. Yes I think they look nice, but function is what I was going after in doing this modification. Prior to installing the louvers I did quite a bit of investigating, research and testing.
With the help of my friend Kevin, who owns an automotive testing lab capable of measuring temperatures and pressures I set out on this task.
Where to install the louvers?
What I was looking for was the most effective location to install the Louvers!
1. Where is the heat the highest under my TJÆs hood?
and...
2. Where if any is there a vacuum (low pressure) location on top of the hood? (Yes even a Jeep has aerodynamics, be they poor.)
Please note I did give some thought to determining where, if any, a high pressure point would be UNDER the hood, but I did not elect to follow up on this.
Temperature Measurements and Findings:
To determine the highest temperature locations under the hood I made more then a few trips to my friend KevinÆs lab. There I borrowed 48 temperature sensors, and the computer/recording device to capture the data I wanted.
The 48 sensors where mounted on the underside of my hood, forming a grid that covered the better part of the under hood. (Approximately 1-inch below the hood)
My plan was to find those areas that would get the hottest, and then look to see if I could install the louvers in this location.
I wasnÆt really sure I needed to this as ōI was sure I knewö where the greatest heat would be found. Trust me, I was wrong.
Here is a simple drawing that reflects the plotted data elements collect from my tests locating the highest under hood air temperatures on my TJ.

The red shaded areas represent the highest temperature areas, under the hood, taken approximately 1-inch below the hood.
Everything under the hood gets hot, yet these areas had temperatures of at least 20 Degrees F hotter then all the others.
Remember when I said ōI already knewö where the heat was located? I was wrong! It wasnÆt on top of the engine or even centered on the exhaust manifold as logic would suggest. Why is this? I have no clue, only guesses. I suspect part of this is due to the air movement caused by the fan, and part probably has something to do with heat being trapped between engine compartment components.
I am sure there may be other good explanation as well. All I know is that I am confident, at least on my Jeep, this drawing represents the highest under hood AIR temperatures, by geography, in my engine compartment. For the record, the single highest temperature I recorded in this effort was located 4-inches in front of the firewall, and 6-inches off the center toward the driver side.
Please note while there are significant differences in high temperatures for each of the three tests that I ran, (Idle, Stop and Go, and Highway) the pattern of High Temp Location never changed significantly. Meaning, the hottest locations remained the hottest locations regardless of what test was performed.
Temperature Testing Methodology
In order to capture the temperatures accurately I used a methodology I have used in another cooling system test write-up. It goes like this:
The equipment I used this time had 48 temp sensors as explained above. Each was mounted to the underside of the hood about 1-inch off the hood. (I was measuring Air temperatures, not surface temperatures.) These sensors recorded time and temperature data, every 3 seconds, to a small hand-held data collection device. All temperatures are in degrees F and recorded to an accuracy of 1/10 of a degree F.
Types of Tests:
I performed a set of three different tests throughout this effort (At Idle, Stop and Go, and Highway). Each set was performed no less then 4 times, prior to installing the louvers and after installing the louvers
At Idle Test:
This test measured and recorded all under hood air temperatures from each of the 48 sensors with the Jeep idling in my driveway for 15 minutes after a 5-minute warm up period.
Stop and Go:
This test was a 6-mile stop and go, inner city drive, after a 5 minute warm up period. Again measuring and recording all under hood air temperatures from each of the 48 sensors. Obviously each test was not exactly the same as stoplights and traffic most likely did differ to a small degree. But the course was indeed exactly the same each time. Max Speed was 25 MPH.
Highway:
This test covered a distance of 18 miles on Interstate 75. Nine miles down the interstate, off the exit, turn around and nine (9) miles back. Highway Speed maintained at 65 MPH. Again measuring and recording all under hood air temperatures from each of the 48 sensors.
Test Notes:
As I stated, each of these tests was conducted multiple times. The data I am sharing is the data I have for those days when the outside air temperature was the hottest for each setup (with or without louvers.)
Also note, the outside air temperatures are different for each of these tests, In every case the outside air temp was lower for the ōNo Louverö tests, then it was for the ōLouveredö tests.
Identifying the Low Pressure / Vacuum Areas on the Hood
I wanted to determine where, if any place on the hood a low pressure or vacuum area might be located. However, seeing as I donÆt have access to a wind tunnel I had to get creative here. I taped to the hood 48 pieces of yarn (wool), each 3-inches long, in the approximate locations to where the under hood temp sensors where mounted. The yarn was taped to the outside surface of the hood and then I simply drove the Jeep and observed what happened..
YouÆd be amazed at how and what directions the yarn will flow and point to. Sometime it even sticks straight up! Good Vacuum for a brick!
Based on more then a few drives with the yarn on my hood (talk about funny looks from people) and a lot of note taking I determined to my satisfaction the low-pressure area.
Here, shaded in the pinkish color are my results.
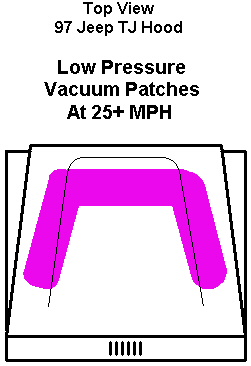
If you decide to do this little exercise on your own be aware you need to get yourself going at least 25 MPH for this to be effective. I could not discern any significant difference in airflow patterns at any speed over 25 MPH.
The shaded areas represent the locations where the yard either shot straight back (To the back of the Jeep) or shot straight UP in the air once up to speed. In some areas, like close to the windshield, the yard pointed toward the front of my Jeep confirming the high-pressure area at the base of the windshield.
After I did all this testing and came to my own conclusions about the low-pressure (vacuum) areas I showed my results to Kevin. He looked at them, dropped them on the table, when to a cabinet, and preceded to hand me a testing tool to validate my results.
Unfortunately he only had two pressure sensors so I had to do a lot of driving, recording, stopping and moving sensors around. But I did it. For what it is worth I can now tell you this; $1.99 worth of yarn and a bit of duck tape came up with the same answer as a very expensive piece of lab test equipment!
Hood Louver Location
I now knew where the highest under hood temperature were located.
I also had to a reasonable degree of accuracy, the locations on the outside of the JeepÆs hood where the low pressure / vacuum areas were located.
To determine where to mount the louvers all I did was to lay one set of data elements on top of the other and look for commonality of location, or overlap.
Here is what it looked like.
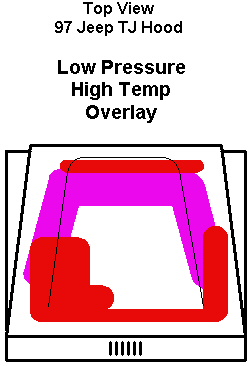
See those locations where the High Temp and Low Pressure areas overlay each other?
ThatÆs where my louvers are installed. (Life is Simple! Life is Good!)
Go here to see the installation!
or
Back to the Installs index
|
|